When an employee goes out of service, you can process this in a number of ways. First, you can use the 'Out of service wizard'. Here you have the option of paying out unused leave hours or keeping them to calculate any pro rata wage components. Second, you can enter an employment end date manually. This requires you to enter any other items by hand. There is also an option to record employees as no longer in service on a broader scale by using the import function. Finally, we'll discuss a few other points that might come up for each format when reporting an 'Out of service'.
- 'Out of service' wizard
- Manually reporting 'Out of service'
- Importing 'Out of service' dates
- Other 'Action points' to consider
'Out of service' wizard
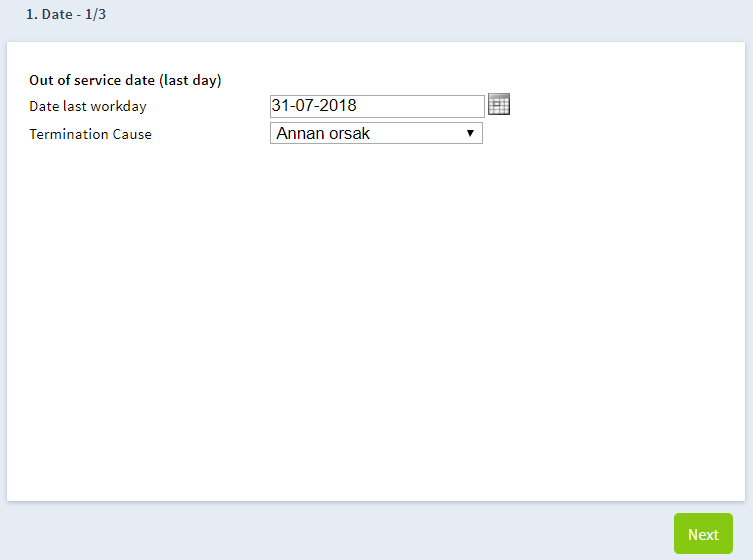
The 'Out of service' wizard can be found at the employee level in the 'Employment' dashlet. This is illustrated in the image below:

1. Enter the employee's last workday and click Next on the lower right.
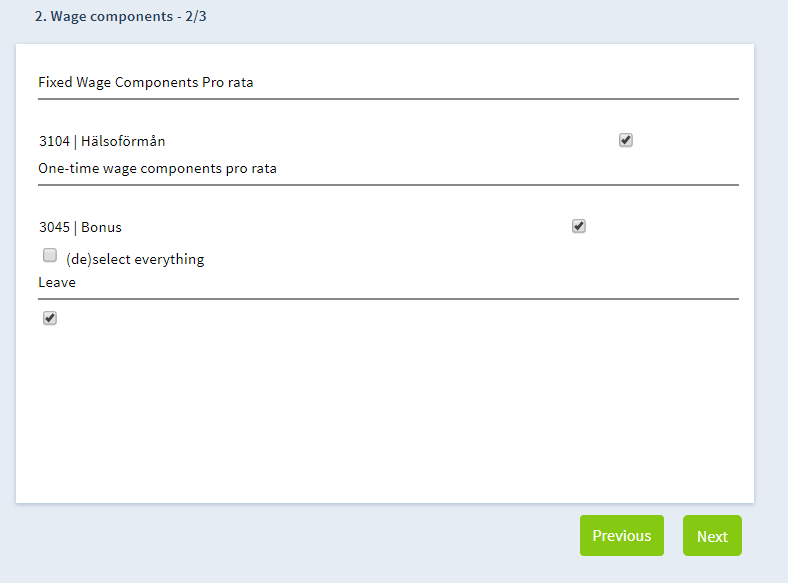
2. If you have added benefits to the employee, here are the action points that might be created. This can act as a reminder, for example, to collect a laptop. Click the 'Finish' button to complete the out of service process.
Entering date of retirement
Before you manually report the employee as 'Out of service', you will have to take any leave or holiday allowances into account. If you want to pay these out upon the 'Out of service' date, this must be set up ahead of time.
Once you have done this, the employee can be registered as 'Out of service'. This can be done by clicking on the 'Out of service' button in the Employment dashlet at the employee level.

If the Out of service date is entered manually, you must take several things into account:
- Salary: If you enter the date of 'Out of service' manually, the salary is automatically calculated pro rata.
- Wage components: For wage components entered in the 'Out of service' month, the desired amount will have to be entered, provided that it has to be calculated pro rata. •Benefits: You can create an action point yourself to be reminded of the collection of any benefit items. You can do this at the employee level in the 'Benefits' dashlet.
Importing date of 'Out of service'
It is also possible to import 'Out of service' dates collectively. You can use the template on the company level for this. After that, you can provide an end date in the 'Employees' tab for both the employment and the contract.
If you only want to register an 'Out of service' date for an employee and do not want to make any further adjustments, fill in only the 'Out of service' date column and 'End of contract' column with the date and the column with the employee reference number. After the template is filled out, you can enter the dates with the 'Update' button.
PLEASE NOTE: Once the dates have been updated, they can no longer be modified.
Additional information: When you carry out an update, all of the data in the Excel sheet are updated. This means that existing (correct) data are also overwritten. Hiding fields in the Excel file does not change this. If you want to make an update, you will only have to enter (retain) the data in Excel that you actually want to change.
Other action points to consider
The following action points must be considered, irrespective of which method is used.
- Access Employee access following 'Out of service': If the employee is out of service and you use the employee login, this will not be deleted automatically. You have the option of choosing to convert an existing employee login to a payslip viewer. The employee can still view payslips this way. It is only when the login is deleted that the employee can no longer use the employee login. You can modify the employee login in the 'Employee login' dashlet; when you delete the existing login, you can create a new login with the 'payslip viewer' template. You can then also select another email address, e.g. a personal email address.
Comments